Photobucket Photobucket Photobucket Photobucket Photobucket Photobucket Photobucket

Friday, April 27, 2012

We Love Our Mother Earth


Finally! I've just now been able to squeeze in some time to update the blog.  Things have been a little chaotic over at our house this week - our son was battling his first-ever fever that was caused by an ear infection, then a bad reaction to the antibiotics, then loss of appetite, and finally he's back to normal.  Not to mention we received a new shipment of merchandise that needed to be tagged and then uploaded to the website.  Craziness!!

This past Sunday, we celebrated Earth Day by creating a little herb garden.  As I've mentioned before, I'm just now getting a little more comfortable cooking and I find it incredibly frustrating when I find a recipe that needs parsley or cilantro so I go to the store and buy some, only to have it spoil days later because I only needed 1/4 tsp of it.  With that in mind, I decided to make a little garden where we can always have fresh herbs available.  

I had my heart set on a particular pot that I had seen at The Home Depot.  But of course, when we went to buy it, there was only one left and it had a crack right over the edge of it.  So off we went to hunt down another one!  After two more stops, I finally found another one that was perfect.  


I started off with 3 bags of Organic Choice potting soil, my awesome pot, and 6 different herbs -
parsley, cilantro, sage, rosemary, mint, and basil.

Ta-da!! All finished!    


After I started my little project I realized that all 6 herbs weren't going to fit.  I ended up returning the basil because I know how much it will grow and we won't have use for all of it.  I'd hate for it to go to waste. 


I love how my mini herb garden turned out and it only took me about an hour to do it.  While my son was having a blast on his swing, I was able to get it all finished.  Only downside, the mosquitos!! I'm anxious to see how these little guys grow!  Now all I need are cute little markers for each herb...any idea where I can find some?

Thanks for stopping by!
Photobucket

Saturday, April 14, 2012

Backyard Oasis - Phase 1

On Thursday, my good friend and I took our 15 month old boys to the beach.  I'm happy to report that the boys had a blast and we (the moms) were pretty proud of ourselves for tackling a successful day trip on our own.  The only downside was that there were a whole bunch of bees that came sneaking up on our little spot under our umbrella and I got scorched.  But my skin will heal and the bees didn't sting anyone.  Unfortunately, we didn't get to snap any pictures because priority #1 was hanging on to our little guys since all they wanted to do was run into the water.  I love that they are so adventurous!  Being out there reminded me how much I enjoy soaking up the sun.  Luckily for us, we only live about an hour away from the beach so we will be heading back out there soon.  

Back on the home front, my husband and I have been planning on what to do with our decently sized backyard since we moved in over a year ago.  We planned to maintain a grassy area where Nicholas could play, but we also wanted to add stamped concrete.  One area would be for a dining set under a pergola, another would be for a sandbox, and lastly, a small, cozy sitting area with a fire pit.  As much as we'd love for this whole project to happen overnight, we know that's just not possible.  But little by little, we've been tackling what we can.

The first project we finished, well my husband really, [ I picked out the fabric :) ] was the sandbox for Nicholas.  I found this great pin on Pinterest with step-by-step instructions on how to build this fantastic sandbox.  The sandbox only took 2 days to complete.  A few days later, Nicholas and his friend Milo broke it in.  The sand freaked them out a little, but they got over it and then ran to the pool!  And since we live in South Texas, this sandbox and pool will be getting a lot of use!   

Here's the semi-complete sandbox.  All that was left was to stain it,
staple the canopy on, and fill it with sand


Here, Milo & Nicholas tried it out for the first time.  I think Milo was telling me a joke here :)

"Mom, could you please stop taking pictures of me? It's embarrassing" 

As soon as they saw the sprinkles of water, they just had to check it out :)

Next step of our backyard transformation - the pergola.  Most of the cedar needed to finish building the pergola has already been delivered and hauled from the curbside to the backyard.  My husband has made the drawing as to how he's going to build it, so all he needs is time.  After the pergola goes up, next on the list is landscaping! That's the one part I'm not looking forward to.  The extreme heat and lack of rain where we live makes having nice plants and flowers challenging.  But, we're still going to try.  

This is what one side of our backyard looks like right now.  In a few weeks  the pergola
will finally be completed (my husband only has 1-2 days a week to work on this project).


Stay tuned to see the big reveal!  Thanks for stopping by!

Tuesday, April 10, 2012

Here Comes Peter Cottontail

Well another Easter has come and gone, and I'm actually a little sad about it.  The warm weather, all the bright and cheery colors of the season, and seeing the smiles on our children's faces as they run around in search for all their eggs and then watch as confetti flies all over, is such a wonderful feeling.

We were pretty busy last week prepping for an Easter party, assembling mini Easter baskets, and painting egg shells.  Here's a look at our life last week in pictures - enjoy :)

Goldfish carrots for the mini Easter baskets

Bunny Bait treats I made for an Easter party
Nicholas was invited to - it was delicious!

This picture makes me laugh every timeI see it! It looks like he's
holding on fordear life!

Working on his little egg decorating project

Score! Nicholas came out with a Rice Krispie Treat!  He kept going back for those...
I think he was mesmerized by the shiny, blue wrapper.


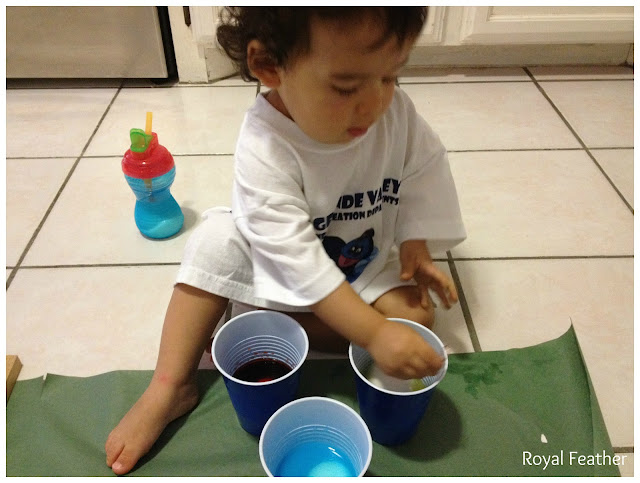
As kids, we always colored Easter eggs with food coloring and vinegar, but I always remember hating the smell.  So now, on Pinterest of course, I learned you can color egg shells with Kool-Aid.  So here's Nick's first attempt at it.  Not too bad for a 15-month old :)


Here are the colors we used for his "Kool-Eggs"

I was pretty surprised to see that we didn't make a huge mess!
Nicholas would just color one egg at a time and then
 let me take it out so it could dry.  I was loving how into it he was!

Now we moved up to coloring 3 colors at one time!

And here is his masterpiece


Saturday afternoon, Nicholas went over to his cousin's house for another Easter party and he had a blast.  Another piñata and another egg hunt!! I was a little disappointed that I couldn't make it to the party (my husband and I had bought tickets months before for a concert out of town. At the time of the purchase, I hadn't realized it was on Easter weekend.  But I knew our son was in good hands with my Mom and sister).  

Nicholas waving "hey" with his cousins Kayla & Claire

Piñata time!!

LOL! He's very happy to have found another Easter basket

Confetti in his curls


On Easter Sunday, we were able to get a great picture of Nicholas with his Easter baskets.  I love his madras pants!


And last but not least, here are a few of my favorite shots of Nick all dressed up for his Easter pictures.  Thank you to All Good Productions for these great photos!


I hope everyone had a blessed and memorable Easter!